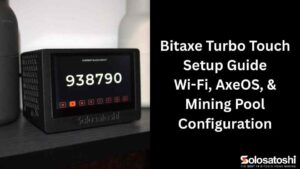
Bitaxe Setup Made Simple: Welcome to Solo Mining
November 28, 2024 by
This Bitaxe setup guide will cover all existing Bitaxe models, including but not limited to: The Bitaxe Ultra, Bitaxe Supra, Bitaxe Gamma, Bitaxe Duo, and the Bitaxe Touch. Please reach out to your retailer if your Bitaxe device is running a different version of firmware or AxeOS.
Updated on January 18, 2026 – firmware version v2.12.0
Sign up for our VIP subscriber list and receive newsletters, discounts, giveaways, and the best deals on Bitcoin home miners!
Table of Contents
1. Safety Guidelines (Please Read Carefully)
1.1 Power Supply Safety
- Use the Provided Power Supply: Third-party power supplies may damage the device or cause hazards. The power supply that is supplied by Solo Satoshi has been tested and studied for this specific device.
- *Note: When using a third-party power supply, CHECK THE OUTPUT VOLTAGE OF THE POWER SUPPLY! Using a 12v power supply on a 5v Bitaxe will result in damaging your device and can potentially lead to injury or pose a fire risk!
- Avoid Overloading Outlets: Do not connect multiple high-power devices to a single outlet. This can trip breakers and poses a serious risk of electrical fire.
1.2 Electrical Safety
- Operate in a dry, ventilated area to avoid moisture damage.
- Unplug the device before performing maintenance or adjustments.
1.3 Physical Handling
- Handle the Bitaxe with care. Avoid dropping or subjecting it to physical shock.
- When installing or removing the screen, do so gently to avoid damage.
1.4 Heat Management
- Ensure the device is in a well-ventilated area. Avoid enclosed spaces.
*NOTE: ASIC chips perform Trillions of computations per second. This requires the ASIC chip to work at extremely hot temperatures of 60-70°C, (158°F). The device you’ve been provided is equipped with thermal overload settings which will put the device into “Overheat Mode” in the event the device overheats.
1.5 Networking Safety
- Use secure Wi-Fi connections. Avoid broadcasting the device’s SSID publicly.
- Set a strong, unique password for your home network.
1.6 General Precautions
- Keep the Bitaxe out of reach of children and pets.
- Don’t open the casing or modify the internals unless directed. This voids the warranty.
1.7 Emergency Procedures
- Fire or Smoke: If smoke or a burning smell occurs, unplug the device immediately. Do not use water to extinguish electrical fires.
1.8 Disposal and Recycling
Dispose of the Bitaxe according to local e-waste regulations. Recycle components where possible.
2. Before You Get Started
2.1 Ensuring the Screen is Properly Seated
The screen is removable by design for easy replacement but may come loose during shipping. Ensure the device’s screen is properly seated before proceeding with Bitaxe setup.
2.2 Troubleshooting Screen Issues
If the screen doesn’t work:
- Remove the power supply from the Bitaxe.
- Remove the screen by gently pulling on the right side.
- Bend the two outermost pins slightly outwards.
- Plug the screen back into the device.
- Plug the power supply back into the device and check functionality.
3. Step-by-Step Bitaxe Setup
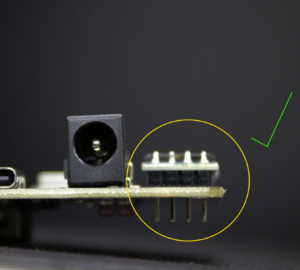
3.1 Powering on Your Device
- Use the provided power supply to plug in your Bitaxe. Ensure the power source is stable.
- After connecting the device to power, press the RESET button.
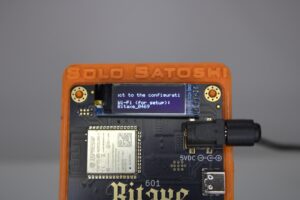
3.2 Identifying the Device’s Wi-Fi Signal
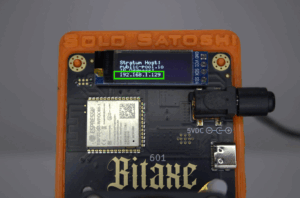
Once powered, the Bitaxe will emit a Wi-Fi signal (SSID). Use a phone, laptop, or desktop to scan for this signal. (Ex. Bitaxe_0469)
3.3 Locating Your Device
Search for the device’s SSID in your mobile phone, laptop, or desktop’s Wi-Fi settings. The SSID displayed on the screen should match the one in the settings. Connect to this SSID.
- *NOTE: When selecting your device’s SSID, do not select “Connect Automatically” if you’re using a desktop or laptop device. Doing so may cause future issues with your devices Wi-Fi connection.

3.4 Accessing the Device’s Operating System
Upon selecting your device’s SSID, a setup window should appear. If not, enter the default IP address 192.168.4.1 in your browser.
- *NOTE: If you have an ASUS router, you must go into your router’s settings and turn AI Protection off. AI Protection will block your device from connecting to Wi-Fi.
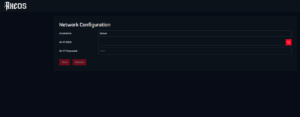
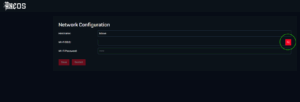
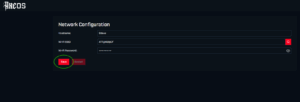
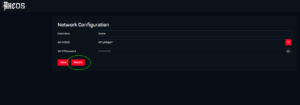
3.5 Configuring Wi-Fi Settings
- Select the magnifying glass icon to scan for your Wi-Fi network.
- Select the correct Wi-Fi network.
- Put in your Wi-Fi networks password (Capital letters and numbers matter).
- Select “Save” to save your Wi-Fi credentials.
- Select “Restart” to reboot your device.
*NOTE: If you enter your Wi-Fi credentials incorrectly, your device will not connect to your Wi-Fi network or display “No AP Found”. Ensure the correct letters are capitalized/lowercase, all numbers/special characters are in their correct spot, and any spaces are accurately inserted.
3.6 Accessing AxeOS via IP Address
Once connected to your home Wi-Fi, the Bitaxe will display an IP address. Use this IP address to access AxeOS in your browser. Ensure your computer or phone is connected to the same Wi-Fi network.
*NOTE: The Wi-Fi chip used on all Bitaxe devices can only connect to a 2.4Ghz Wi-Fi signal. Most modern routers will emit both 5.0Ghz and 2.4Ghz signals.

3.7 Connecting a Bitcoin Wallet
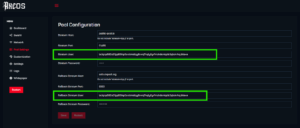
- Navigate to the “Pool Settings” tab in AxeOS.
- Enter your valid on-chain Bitcoin wallet address in the “Stratum User” and “Fallback Stratum User” fields.
- Click Save and Restart to apply new wallet configuration.
*NOTE: If you do not enter a valid on-chain Bitcoin receiving address, your device will not work correctly. Lightning addresses cannot be used in these fields.


4. Final Steps and Additional Information
4.1 Final Remarks and Congratulations
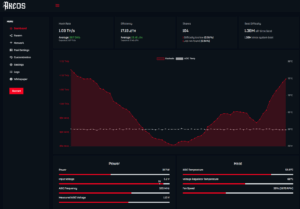
Your Bitaxe is now operational. You can monitor its performance, including hash rate and submitted shares, via AxeOS by selecting the dashboard tab.
4.2 Comments and Assistance
If this tutorial was helpful for Bitaxe setup, please leave our small business a review! For technical assistance, please visit Contact SoloSatoshi.com and submit a support ticket.
4.3 Full Product Lineup
Explore Solo Satoshi’s full range of open-source Bitaxe Bitcoin home miners here.
4.4 Helpful Quick Links
- Maintenance and Care.
- Recommended Bitcoin Wallets.
- Device Overheating.
- Unresponsive/Bricked Device.
- Updating Firmware.
- What is Bitaxe?
- Understanding Mining Pools.
- What is a Solo Miner?
- How to Solo Mine Bitcoin?
- What is Bitcoin Lottery Mining?
- Mining Terms/Vocabulary.
- Customer Service/Technical Support.
5. Frequently Asked Questions (FAQ)
1. Verify Pool Settings: Double-check the Stratum URL and port number in AxeOS. Test with Public-Pool:
Stratum Host: public-pool.io | Stratum Port: 21496
2. Router Interference: Some routers have a setting called “AI Protection” or “Wi-Fi protection”. If enabled, these settings prevent your Bitaxe from connecting to Wi-Fi, which will not allow it to mine.
3. Verify Bitcoin Wallet Address: Verify the Stratum User field is a valid on-chain Bitcoin address. No lightning addresses can be used in this field. Some apps also generate non-compatible Bitcoin wallet receiving addresses.
Test with default wallet address: bc1qnp980s5fpp8l94p5cvttmtdqy8rvrq74qly2yrfmzkdsntqzlc5qkc4rkq
1. Verify Wi-Fi Credentials: Be sure your Wi-Fi name (SSID) is correct; be sure there are no spaces before or after your Wi-Fi name and that the correct letters are uppercase or lowercase. Verify your Wi-Fi password the same exact way.
2. Verify 2.4GHz Network: The ESP-microcontroller chip on the Bitaxe will only connect to a 2.4GHz Wi-Fi signal. Most modern routers are equipped with 2.4GHz and 5.0GHz signals. You may have to access your router and enable this.
3. Verify Wi-Fi Range: Be sure your Bitaxe is in close enough to your router. Having your Bitaxe too far away my result in a weak Wi-Fi signal.
Verify Screen Connection to Bitaxe: *Only works for non-soldered screens.
1. Remove power from the device.
2. Remove the screen by gently pulling on the right side.
3. Bend the two outermost pins outward slightly.
4. Reinstall the screen.
5. Plug the device back in and check functionality.
6. Contact seller if problem persists.
Verify fan connector on Bitaxe:
1. Remove power from device.
2. Gently remove fan connector from the device.
3. Check for broken pins or connectors.
4. Inspect fan wires for knicks or damage.
5. Plug fan back into fan connector.
6. Contact seller if problem persists.
A Bitaxe self-test failure typically indicates a hardware or configuration issue preventing the miner from booting up and operating correctly. Here’s what it generally means, and how you can troubleshoot it:
1. Incorrect Configuration:
Wrong ASIC chip model selected.
Improper firmware or configuration file used.
2. Hardware Issues:
Loose or damaged hardware connections.
Overheating or inadequate cooling.
Power supply instability or insufficient voltage.
3. Firmware Issues:
Firmware corruption or incomplete flashing.
4. Contact seller if problem persists.
Most hardware wallets, crypto exchange wallets, and app-based wallets with valid on-chain Bitcoin receiving addresses are compatible with Bitaxe. This includes Legacy, SegWit, Native SegWit, and Taproot (Bech32m).
Test with default wallet address: bc1qnp980s5fpp8l94p5cvttmtdqy8rvrq74qly2yrfmzkdsntqzlc5qkc4rkq
No.
This is simply to assign a name your worker for monitoring or quick reference when viewing the pool or node that your device is pointed to.
Example: bc1qnp980s5fpp8l94p5cvttmtdqy8rvrq74qly2yrfmzkdsntqzlc5qkc4rkq.Bitaxe1